1.Spring框架
1.1.Spring框架简介
Spring是一个基于java的轻量级的、一站式框架。 虽然Spring是一个轻量级框架,但并不表示它的功能少。实际上,spring是一个庞然大物,包罗万象。 时至今日,Spring已经成为java世界中事实上的标准。
Spring之父:Rod Johnson(罗德.约翰逊) 他是悉尼大学音乐学博士,而计算机仅仅是学士学位。 由于Rod对JAVAEE笨重、臃肿的现状深恶痛绝,以至于他将他在JAVAEE实战中的经历称为噩梦般的经历。他决定改变这种现状,于是就有了Spring。

1.2.Spring体系架构
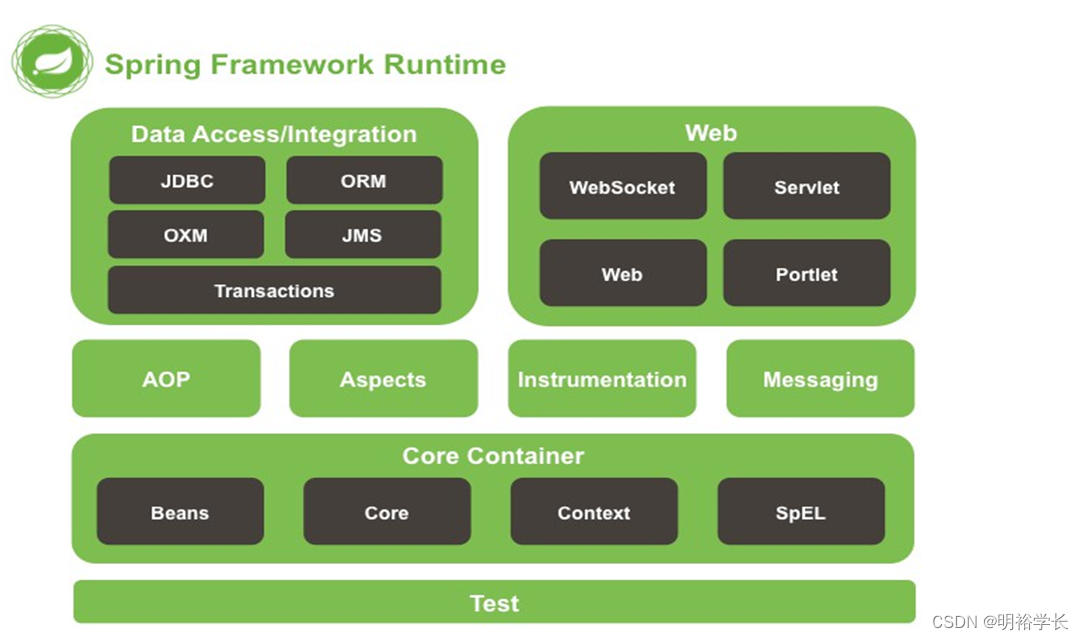
Spring 总共大约有 20多个模块,由 1300 多个不同的文件构成。而这些组件被分别整合在6 个模块中:
-
核心容器(Core Container)
-
AOP(Aspect Oriented Programming)
-
设备支持(Instrmentation)
-
数据访问及集成(Data Access/Integeration)
-
Web报文发送(Messaging)
-
Test测试
1.3.Spring两大核心
DI:依赖注入(Dependency Injection)
AOP:面向切面编程(Aspect Oriented Programming)
2.DI(依赖注入)
依赖注入(Dependency Injection)是一种设计模式,也是Spring框架的核心概念之一。其作用是去除组件之间的依赖关系,实现解耦合。

也就是说:所谓依赖注入,是指工程中需要的组件无须自己创建,而是依赖于外部环境注入。
Spring实现依赖注入有三种方式:注解方式、xml配置文件方式、javaConfig方式。
2.1.使用xml实现DI
下面使用 Spring 来重构dao层组件与service层组件。 也就是说:由Spring创建dao层组件和service层组件,并使用Spring将dao层组件注入给service层组件。
2.1.1.添加Spring依赖
<project xmlns="http://maven.apache.org/POM/4.0.0"
xmlns:xsi="http://www.w3.org/2001/XMLSchema-instance"
xsi:schemaLocation="http://maven.apache.org/POM/4.0.0 https://maven.apache.org/xsd/maven-
4.0.0.xsd">
<modelVersion>4.0.0</modelVersion>
<groupId>com.neusoft</groupId>
<artifactId>sp</artifactId>
<version>0.0.1-SNAPSHOT</version>
<build>
<plugins>
<!-- 设置jdk版本 -->
<plugin>
<groupId>org.apache.maven.plugins</groupId>
<artifactId>maven-compiler-plugin</artifactId>
<configuration>
<source>1.8</source>
<target>1.8</target>
<encoding>utf-8</encoding>
</configuration>
</plugin>
</plugins>
</build>
<dependencies>
<!-- 此依赖会关联引用Spring中的所有基础jar包 -->
<dependency>
<groupId>org.springframework</groupId>
<artifactId>spring-context</artifactId>
<version>5.3.20</version>
</dependency>
</dependencies>
</project>
Spring所依赖jar包的作用:
-
spring-core.jar:包含Spring 框架基本的核心工具类。Spring 其它组件要都要使用到这个包里的类,是其它组件的基本核心。
-
spring-beans.jar:包含访问配置文件、创建和管理bean等相关类。如果应用只需基本的IoC/DI 支持,引入spring-core.jar 及spring-beans.jar 文件就可以了。
-
spring-context.jar:包含为Spring 核心提供的大量扩展。比如:后面要使用的ApplicationContext接口就在这里。
-
spring-aop:包含Spring的AOP 特性时所需的类和源码级元数据支持。
-
spring-expression:包含Spring表达式语言。比如,在Spring配置文件中也可以使用${}、#{}这样的表达式语言
-
spring-jcl.jar:包含Spring日志框架。
2.1.2.创建dao接口与实现类
package com.neusoft.dao;
import com.neusoft.po.User;
public interface UserDao {
public User getUser();
}
package com.neusoft.dao.impl;
import com.neusoft.dao.UserDao;
import com.neusoft.po.User;
public class UserDaoImpl implements UserDao{
@Override
public User getUser() {
return new User(1,"test","111");
}
}2.1.3.创建service接口与实现类
package com.neusoft.service;
import com.neusoft.po.User;
public interface UserService {
public User getUser();
}
package com.neusoft.service.impl;
import com.neusoft.dao.UserDao;
import com.neusoft.po.User;
import com.neusoft.service.UserService;
public class UserServiceImpl implements UserService{
private UserDao userDao;
@Override
public User getUser() {
return userDao.getUser();
}
public UserDao getUserDao() {
return userDao;
}
public void setUserDao(UserDao userDao) {
this.userDao = userDao;
}
}2.1.4.创建Spring配置文件
在类路径下创建spring.xml配置文件:
<?xml version="1.0" encoding="UTF-8"?>
<beans
xmlns="http://www.springframework.org/schema/beans"
xmlns:context="http://www.springframework.org/schema/context"
xmlns:aop="http://www.springframework.org/schema/aop"
xmlns:xsi="http://www.w3.org/2001/XMLSchema-instance"
xsi:schemaLocation="http://www.springframework.org/schema/beans
http://www.springframework.org/schema/beans/spring-beans.xsd
http://www.springframework.org/schema/context
http://www.springframework.org/schema/context/spring-context.xsd
http://www.springframework.org/schema/aop
http://www.springframework.org/schema/aop/spring-aop-4.1.xsd">
<bean id="userDao" class="com.neusoft.dao.impl.UserDaoImpl"></bean>
<bean id="userService" class="com.neusoft.service.impl.UserServiceImpl">
<property name="userDao" ref="userDao"/>
</bean>
</beans>
Spring配置文件就相当于一个容器。此容器中负责创建对象,并实现对象与对象之间的装配。
java中每一个类都是一个bean。所以上面的bean标签,就是在容器中创建一个java对象。
bean标签中的class属性,就是类名; id属性,就是对象名。
property标签,是给bean的属性注入其它对象。name属性,就是对象属性名; ref属性,就是给属性注入的对象。(如果想要注入基本数据类型,那么使用value属性)
给bean的属性注入其它对象,默认使用 get/set 方法注入。也可以使用其它方式注入:构造方法注入、P命名空间注入等。
2.1.5. 测试
package com.neusoft;
import org.springframework.context.ApplicationContext;
import org.springframework.context.support.ClassPathXmlApplicationContext;
import com.neusoft.po.User;
import com.neusoft.service.UserService;
public class MySpringTest {
public static void main(String[] args) {
//读取Spring配置文件,获取Spring容器
ApplicationContext context = new ClassPathXmlApplicationContext("spring.xml");
//通过Spring容器的getBean方法获得对象
UserService service = (UserService)context.getBean("userService");
User user = service.getUser();
System.out.println(user);
}
}
2.1.6. 使用log4j输出日志
上面实例运行后,除了输出业务结果,并没有任何日志信息。下面使用log4j输出日志。
导入log4j依赖:
<properties>
<log4j2.version>2.12.1</log4j2.version>
</properties>
<dependencies>
<!-- 此依赖会关联引用Spring中的所有基础jar包 -->
<dependency>
<groupId>org.springframework</groupId>
<artifactId>spring-context</artifactId>
<version>5.3.20</version>
</dependency>
<dependency>
<groupId>org.apache.logging.log4j</groupId>
<artifactId>log4j-core</artifactId>
<version>${log4j2.version}</version>
</dependency>
<dependency>
<groupId>org.apache.logging.log4j</groupId>
<artifactId>log4j-web</artifactId>
<version>${log4j2.version}</version>
</dependency>
</dependencies>
在类路径下创建log4j2.xml配置文件
<?xml version="1.0" encoding="UTF-8"?>
<configuration status="DEBUG">
<appenders>
<!--输出日志信息到控制台 -->
<console name="Console" target="SYSTEM_OUT">
<!--控制日志输出的格式 -->
<PatternLayout
pattern="%d{yyyy-MM-dd HH:mm:ss.SSS} [%t] %-5level %logger{36} - %msg%n" />
</console>
</appenders>
<loggers>
<!--控制日志输出的级别 -->
<root level="DEBUG">
<appender-ref ref="Console" />
</root>
</loggers>
</configuration>
测试之后就会出现如下日志信息
2022-05-13 11:47:22.164 [main] DEBUG
org.springframework.beans.factory.xml.XmlBeanDefinitionReader - Loaded 2 bean definitions from
class path resource [spring.xml]
2022-05-13 11:47:22.189 [main] DEBUG
org.springframework.beans.factory.support.DefaultListableBeanFactory - Creating shared instance
of singleton bean 'userDao'
2022-05-13 11:47:22.200 [main] DEBUG
org.springframework.beans.factory.support.DefaultListableBeanFactory - Creating shared instance
of singleton bean 'userService'
1 test 111
2.2.使用注解实现DI
2.2.1.修改Spring配置文件
<?xml version="1.0" encoding="UTF-8"?>
<beans
xmlns="http://www.springframework.org/schema/beans"
xmlns:context="http://www.springframework.org/schema/context"
xmlns:aop="http://www.springframework.org/schema/aop"
xmlns:xsi="http://www.w3.org/2001/XMLSchema-instance"
xsi:schemaLocation="http://www.springframework.org/schema/beans
http://www.springframework.org/schema/beans/spring-beans.xsd
http://www.springframework.org/schema/context
http://www.springframework.org/schema/context/spring-context.xsd
http://www.springframework.org/schema/aop
http://www.springframework.org/schema/aop/spring-aop-4.1.xsd">
<!--开启注解扫描,设置需要扫描的包 -->
<context:component-scan base-package="com.neusoft"/>
</beans>
context:component-scan标签中的base-package属性,设置需要扫描的包。
会到指定包(包括指定包下的所有子包)中扫描类、方法、属性上面是否有注解。(如有多个,可使用逗号分隔)
2.2.2.修改dao实现类
package com.neusoft.dao.impl;
import org.springframework.stereotype.Component;
import com.neusoft.dao.UserDao;
import com.neusoft.po.User;
@Component
public class UserDaoImpl implements UserDao{
@Override
public User getUser() {
return new User(1,"test","111");
}
}
@Component:创建此类的对象,并放入到Spring容器中。
@Component("xxxx"):创建此类的对象,取一个对象名,并放入到Spring容器中。
2.2.3.修改Service实现类
package com.neusoft.service.impl;
import org.springframework.beans.factory.annotation.Autowired;
import org.springframework.stereotype.Component;
import com.neusoft.dao.UserDao;
import com.neusoft.po.User;
import com.neusoft.service.UserService;
@Component("userService")
public class UserServiceImpl implements UserService{
@Autowired
private UserDao userDao;
@Override
public User getUser() {
return userDao.getUser();
}
//注意:UserDao属性自动注入,所以就可以不用get/set方法了
}
@Autowired:默认按照类型在Spring容器寻找对象,并注入到属性中。
所以此时要注意:UserDao接口的实现类只能有一个。
2.2.4.测试
测试类没有变化。
package com.neusoft;
import org.springframework.context.ApplicationContext;
import org.springframework.context.support.ClassPathXmlApplicationContext;
import com.neusoft.po.User;
import com.neusoft.service.UserService;
public class MySpringTest {
public static void main(String[] args) {
//读取Spring配置文件,获取Spring容器
ApplicationContext context = new ClassPathXmlApplicationContext("spring.xml");
//通过Spring容器的getBean方法获得对象
UserService service = (UserService)context.getBean("userService");
User user = service.getUser();
System.out.println(user);
}
}
2.2.5.相关注解说明
2.2.5.1.组件级注解
除了@Component这个泛指组件的注解外,Spring还提供了与@Component功能相同的三个语义化注解。
-
@Service 业务层组件
-
@Controller 控制层组件
-
@Repository 数据层组件
修改上面代码,使用@Repository 和 @Service 替换 dao 与 service 组件上的注解。
@Repository
public class UserDaoImpl implements UserDao{ }
@Service("userService")
public class UserServiceImpl implements UserService{ } 2.2.5.2.Bean作用范围注解
@Scope() 注解:设置Bean的作用域。值如下:
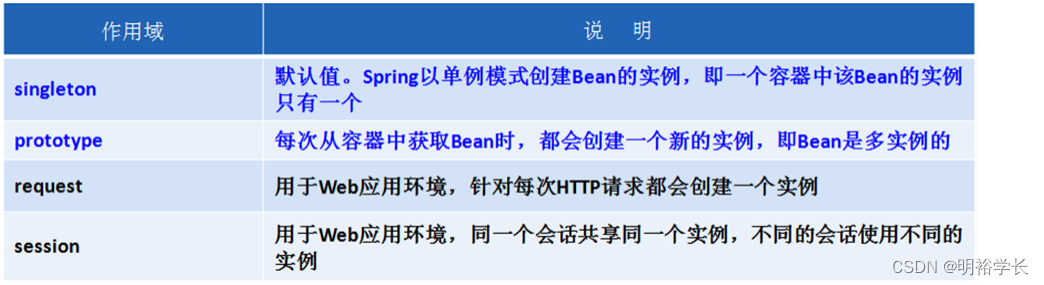
在UserServiceImpl中添加@Scope注解:
@Service("userService")
@Scope("prototype")
public class UserServiceImpl implements UserService{ }
在测试类中测试多例:
ApplicationContext context = new ClassPathXmlApplicationContext("spring.xml");
UserService service1 = (UserService)context.getBean("userService");
UserService service2 = (UserService)context.getBean("userService");
System.out.println(service1==service2); //false
2.2.5.3.自动注入组件注解
@Autowired 注解:默认按照类型自动给属性注入Spring容器中的对象。所以可以不取对象名。
如果需要按照对象名给属性注入,那么可以配合@Qualifier注解使用。
1.首先,给UserDao取对象名
@Repository("userDao")
public class UserDaoImpl implements UserDao{ }
2.用@Qualifier通知@Autowired 注解,注入对象名为userDao的对象
@Autowired
@Qualifier("userDao")
private UserDao userDao;
2.3.使用javaConfig实现DI
javaConfig,是在 Spring 3.0 开始从一个独立的项目并入到 Spring 中的。javaConfig 可以看成一个用于完成Bean 装配的 Spring 配置文件,即 Spring 容器,只不过该容器不是 XML文件,而是由程序员使用 java 自己编写的 java 类。
一个类中只要标注了@Configuration注解,这个类就可以为spring容器提供Bean定义的信息了,或者说这个类就成为一个spring容器了。
标注了@Configuration和标注了@Component的类一样是一个Bean,可以被Spring的 context:component-scan标签扫描到。类中的每个标注了@Bean的方法都相当于提供了一个Bean的定义信息。
2.3.1.创建javaConfig类
package com.neusoft;
import org.springframework.beans.factory.annotation.Configurable;
import org.springframework.context.annotation.Bean;
import org.springframework.context.annotation.Configuration;
import com.neusoft.dao.UserDao;
import com.neusoft.dao.impl.UserDaoImpl;
import com.neusoft.service.UserService;
import com.neusoft.service.impl.UserServiceImpl;
@Configuration
public class AppConfig {
@Bean
public UserDao userDao() {
return new UserDaoImpl();
}
@Bean
public UserService userService() {
//这里不能声明接口类型
UserServiceImpl userService = new UserServiceImpl();
//配置依赖关系(需要set方法)
userService.setUserDao(userDao());
return userService;
}
}
2.3.2.测试
ApplicationContext context = new ClassPathXmlApplicationContext("spring.xml");
UserService service = (UserService)context.getBean("userService");
User user = service.getUser();
System.out.println(user);
2.4.BeanFactory与ApplicationContext
获取Spring容器也可以使用BeanFactory接口。BeanFactory与ApplicationContext的区别是:
-
BeanFactory
Bean工厂(org.springframework.beans.factory.BeanFactory)是Spring框架最核心的接口,提供了IoC的配置机制,使管理不同类型的Java对象成为可能。特点是:采用延迟加载Bean,直到第一次使用Bean实例时才会创建Bean。
-
ApplicationContext
应用上下文(org.springframework.context.ApplicationContext),继承自BeanFactory,提供了更多面向应用的功能,比如国际化支持、框架事件体系,更易于创建实际应用。
应用时,我们一般称BeanFactory为IoC容器,ApplicationContext为应用上下文:
-
BeanFactory是Spring框架的基础设施,面向Spring本身;
-
ApplicationContext面向使用Spring框架的开发者;
-
几乎所有的应用场合都可以直接使用ApplicationContext而非底层的BeanFactory;
2.5.IOC与DI
IOC:控制反转(Inversion of Control):它是一种控制权的转移。即组件与组件之间的依赖由主动变为被动。也就是说:应用程序本身不再负责组件的创建、维护等,而是将控制权移交出去。从这一点来说,几乎所有的框架都是IOC框架。
DI:依赖注入(Dependency Injection):依赖其他容器(比如spring)来创建和维护所需要的组件,并将其注入到应用程序中。
IOC只是将组件控制权移交出去,但并没有说明组件如何获取。而DI明确说明:组件依赖Spring容器获取。
所以可以这样说:DI是IOC思想的一种具体实现。
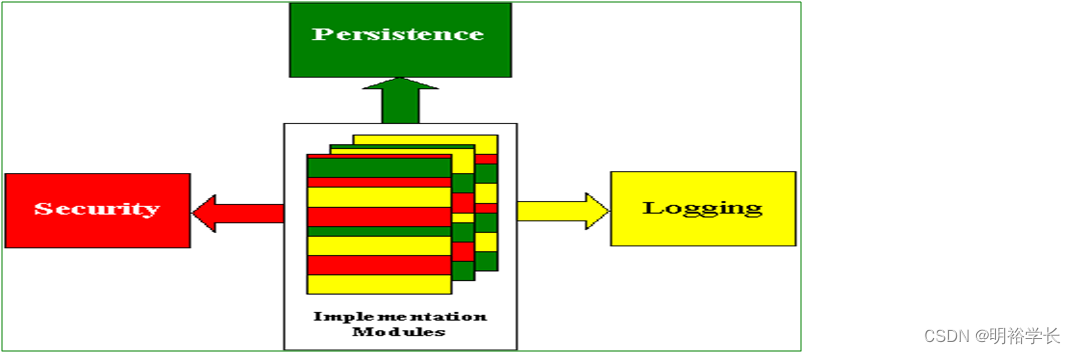
3.AOP(面向切面)
AOP:全称是 Aspect Oriented Programming 即:面向切面编程。
简单的说它就是把我们程序重复的代码抽取出来,在需要执行的时候,使用动态代理的技术,在不修改源码的基础上,对我们的已有方法进行增强。
即当需要扩展功能时,传统方式采用纵向继承方式实现。但这种方式有很多缺点。 比如:父类方法名称改变时,子类也要修改。给多个方法扩展功能时,子类也需要修改。 因此,spring的AOP,实际上是采用横向抽取机制,取代传统的纵向继承体系。
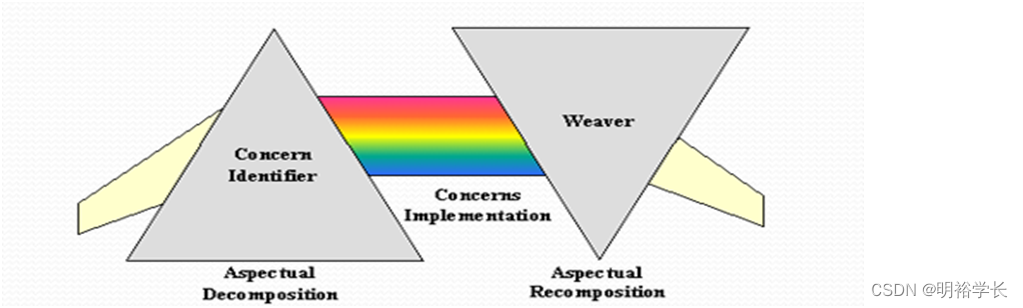
实现AOP示意图:
1.先将方面代码抽取出来
2.运行时将业务代码和方面代码编织在一起
Spring AOP 可以使用xml文件形式实现,也可以使用注解方式实现。下面只使用注解方式实现Spring AOP。
3.1.使用注解方式实现AOP
下面例子功能为:在运行业务方法前,输出一段日志。
3.1.1.添加aspectj依赖
Aspectj是一个基于java的、面向切面的AOP框架。Spring2.0之后增加了对Aspectj切点表达式的支持。而实际开发中一般都使用Aspectj方式来实现AOP。所以还要导入Aspectj相关jar包。
<dependency>
<groupId>org.aspectj</groupId>
<artifactId>aspectjweaver</artifactId>
<version>1.8.7</version>
</dependency>
3.1.2.抽取方面代码封装通知对象
在实际开发中,除了业务逻辑这个主要功能之外,还需要处理许多辅助功能。 比如:日志、异常处理、事务、输入验证、安全等等,我们将这些代码称为:方面代码。而方面代码,就是我们要抽取出来的。
下面抽取日志方面代码:
package com.neusoft.advice;
import org.aspectj.lang.JoinPoint;
import org.aspectj.lang.annotation.Aspect;
import org.aspectj.lang.annotation.Before;
import org.springframework.stereotype.Component;
@Component
@Aspect //@Aspect定义此类为方面代码,即是一个通知。
public class MyAdvice {
@Before("execution(* com.neusoft.service.impl.*.*(..))")
public void beforeMethod(JoinPoint joinpoint){
System.out.println("【前置通知日志】" + joinpoint.toString());
}
}
@Aspect注解:定义此类为方面代码,即是一个通知。
@Before注解:定义一个前置通知。即在目标方法执行前切入此注解标注的方法。
execution() 是一个Aspect表达式,语法为:execution(返回值类型 包名.类名.方法名 (参数) 异常)
/*
* 例如:execution(* com.neusoft.service.impl.*.*(..))
* 第一个 *:所有的返回值类型
* 第二个 *:所有的类
* 第三个 *:所有的方法
* 第四个 .. :所有的参数
*/
3.1.3.修改Spring配置文件
<?xml version="1.0" encoding="UTF-8"?>
<beans
xmlns="http://www.springframework.org/schema/beans"
xmlns:context="http://www.springframework.org/schema/context"
xmlns:aop="http://www.springframework.org/schema/aop"
xmlns:xsi="http://www.w3.org/2001/XMLSchema-instance"
xsi:schemaLocation="http://www.springframework.org/schema/beans
http://www.springframework.org/schema/beans/spring-beans.xsd
http://www.springframework.org/schema/context
http://www.springframework.org/schema/context/spring-context.xsd
http://www.springframework.org/schema/aop
http://www.springframework.org/schema/aop/spring-aop-4.1.xsd">
<!--开启注解扫描,设置需要扫描的包 -->
<context:component-scan base-package="com.neusoft"/>
<!-- 声明自动为spring容器中那些配置@Aspect切面的bean创建代理,织入切面。 -->
<aop:aspectj-autoproxy/>
</beans>
aop:aspectj-autoproxy标签:声明自动为spring容器中那些配置@Aspect切面的bean创建代理,织入切面。
3.1.4.测试
public static void main(String[] args) {
//读取Spring配置文件,获取Spring容器
ApplicationContext context = new ClassPathXmlApplicationContext("spring.xml");
//通过Spring容器的getBean方法获得对象
UserService service = (UserService)context.getBean("userService");
User user = service.getUser();
System.out.println(user);
}
3.2.五种通知类型
方面代码一般也称为通知:定义一个“切面”要实现的功能。通知有五种:
-
前置通知:在某连接点(JoinPoint 就是要织入的业务方法)之前执行的通知。
-
后置通知:当某连接点退出时执行的通知(不论是正常结束还是发生异常)。
-
返回通知:(最终通知)在这里可以得到业务方法的返回值。但在发生异常时无法得到返回值。
-
环绕通知:包围一个连接点的通知,也就是在业务方法执行前和执行后执行的通知。
-
异常通知:在业务方法发生异常时执行的通知。
package com.neusoft.advice;
import org.aspectj.lang.JoinPoint;
import org.aspectj.lang.ProceedingJoinPoint;
import org.aspectj.lang.annotation.After;
import org.aspectj.lang.annotation.AfterReturning;
import org.aspectj.lang.annotation.AfterThrowing;
import org.aspectj.lang.annotation.Around;
import org.aspectj.lang.annotation.Aspect;
import org.aspectj.lang.annotation.Before;
import org.aspectj.lang.annotation.Pointcut;
import org.springframework.stereotype.Component;
@Component
@Aspect
public class MyAdvice {
//定义通用Aspect表达式,下面通知方法就可以引用此方法的规则了
@Pointcut("execution(* com.neusoft.service.impl.*.*(..))")
private void anyMethod(){}
@Before("anyMethod()")
public void beforeMethod(JoinPoint joinpoint){
System.out.println("【前置通知日志】" + joinpoint.toString());
}
@After("anyMethod()")
public void afterMethod(JoinPoint joinpoint){
System.out.println("后置通知日志" + joinpoint.toString());
}
@AfterReturning(pointcut="anyMethod()",returning="result")
public void afterReturnning(JoinPoint joinpoint,Object result){
System.out.println("返回通知日志" + joinpoint.toString());
}
@AfterThrowing(pointcut="anyMethod()",throwing="ex")
public void afterThrowing(JoinPoint joinpoint,Exception ex){
System.out.println("异常通知日志" + joinpoint.toString());
}
@Around("anyMethod()")
public Object aroundMethod(ProceedingJoinPoint pjp) {
Object obj = null;
try{
System.out.println("环绕通知日志" + pjp.toString());
obj = pjp.proceed();
}catch(Throwable e){
e.printStackTrace();
}
return obj;
}
}
注意:
如果配置了环绕通知,那么业务方法的执行将在环绕通知中的obj = pjp.proceed();这段代码时开始执行。此时要注意:如果环绕通知方法不写返回值,或者obj = pjp.proceed()这段代码如果不取得返回值,那么返回通知也不能取得返回值。
有了环绕通知,异常通知也将失去作用。
实际上,如果要配置环绕通知,那么其他通知就失去意义了。因为在环绕通知中,也可以在方法执行前、执行后做方面代码,包括获取返回值、做异常处理等。
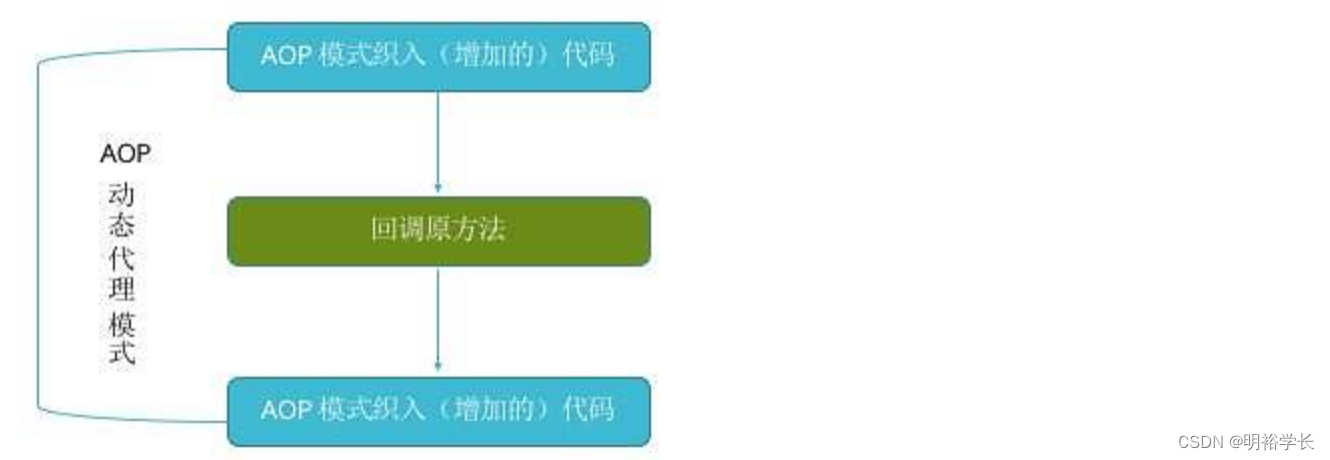
3.3.Spring动态代理的两种形式
3.3.1.两种动态代理
动态代理是一种常用的设计模式,广泛应用于框架中,Spring框架的AOP特性就是应用动态代理实现的。
实现动态代理有两种形式:
-
jdk动态代理:根据目标类接口获取代理类实现规则,生成代理对象。这个代理对象,也是目标类接口的一个实现类。
-
cglib动态代理:根据目标类本身获取代理类实现规则,生成代理对象。这个代理对象,也是目标类的一个子类。 (如果目标类为final,则不能使用CGLib实现动态代理)
SpringAOP可以自动在jdk动态代理和CGLib动态代理之间进行切换,规则如下:
-
如果目标对象实现了接口,采用jdk动态代理实现aop。
-
如果目标对象没有实现接口,采用CGLib动态代理实现aop。
-
如果目标对象实现了接口,但仍然想要使用CGLIB实现aop,可以手动进行配置。
3.3.2.性能测试
我们通过获取执行代码所耗费的时间,来实际测试两种动态代理方式的性能对比。
1.jdk动态代理测试:
public static void main(String[] args) {
ApplicationContext context = new ClassPathXmlApplicationContext("spring.xml");
long begin = System.currentTimeMillis();
//使用接口
UserService service = (UserService)context.getBean("userService");
User user = service.getUser();
long end = System.currentTimeMillis();
System.out.println("执行时间:"+(end-begin));
}
2. cglib动态代理测试:
public static void main(String[] args) {
ApplicationContext context = new ClassPathXmlApplicationContext("spring.xml");
long begin = System.currentTimeMillis();
//不使用接口
UserServiceImpl service = (UserServiceImpl)context.getBean("userService");
User user = service.getUser();
long end = System.currentTimeMillis();
System.out.println("执行时间:"+(end-begin));
}
注意:service层不再实现接口。
4.Spring集成MyBatis
所谓的Spring集成MyBatis,就是由Spring给MyBatis注入需要的组件。比如:DataSource(数据源)、SqlSessionFactory、sqlSession、事务管理对象等。
4.1.添加集成MyBatis的依赖
创建工程,并添加MyBatis、Spring相关依赖
<properties>
<spring.version>5.3.20</spring.version>
</properties>
<dependencies>
<dependency>
<groupId>org.springframework</groupId>
<artifactId>spring-context</artifactId>
<version>${spring.version}</version>
</dependency>
<!--spring对jdbc的支持依赖包(关联spring-tx包) -->
<dependency>
<groupId>org.springframework</groupId>
<artifactId>spring-jdbc</artifactId>
<version>${spring.version}</version>
</dependency>
<!-- mybatis-spring 依赖包 -->
<dependency>
<groupId>org.mybatis</groupId>
<artifactId>mybatis-spring</artifactId>
<version>2.0.0</version>
</dependency>
<!--mybatis 依赖包 -->
<dependency>
<groupId>org.mybatis</groupId>
<artifactId>mybatis</artifactId>
<version>3.5.9</version>
</dependency>
<!-- mysql驱动 依赖包 -->
<dependency>
<groupId>mysql</groupId>
<artifactId>mysql-connector-java</artifactId>
<version>5.1.6</version>
</dependency>
</dependencies>
4.2.创建Mapper
package com.neusoft.ms.mapper;
import org.apache.ibatis.annotations.Mapper;
import org.apache.ibatis.annotations.Select;
import org.apache.ibatis.annotations.Update;
import com.neusoft.ms.po.Emp;
@Mapper
public interface EmpMapper {
@Select("select * from emp where empno=#{empno}")
public Emp getEmpById(int empno);
}
在Mapper接口上添加@Mapper注解,Spring容器扫描到此注解后,就会将SqlSession注入给Mapper组件。
4.3.添加db.properties文件
jdbc.driver=com.mysql.jdbc.Driver
jdbc.url=jdbc:mysql://localhost:3306/emp?characterEncoding=utf-8
jdbc.username=root
jdbc.password=123
4.4.Spring容器中添加组件
<!--开启注解扫描,设置需要扫描的包(用于扫描测试时用的Service组件) -->
<context:component-scan base-package="com.neusoft.ms"/>
<!-- 引入db配置文件 -->
<context:property-placeholder location="classpath:db.properties" />
<!-- 配置dataSource数据源 -->
<bean id="dataSource"
class="org.springframework.jdbc.datasource.DriverManagerDataSource">
<property name="driverClassName" value="${jdbc.driver}"></property>
<property name="url" value="${jdbc.url}"></property>
<property name="username" value="${jdbc.username}"></property>
<property name="password" value="${jdbc.password}"></property>
</bean>
<!-- 创建SqlSessionFactory,并配置实体对象别名 -->
<bean id="sqlSessionFactory" class="org.mybatis.spring.SqlSessionFactoryBean">
<property name="dataSource" ref="dataSource"></property>
<property name="typeAliasesPackage" value="com.neusoft.ms.po" />
</bean>
<!-- 配置Mapper,自动扫描Mapper接口,并为其注入SqlSessionFactory -->
<bean class="org.mybatis.spring.mapper.MapperScannerConfigurer">
<property name="basePackage" value="com.neusoft.ms.mapper"></property>
<property name="sqlSessionFactoryBeanName" value="sqlSessionFactory"></property>
</bean>
这里,配置了sqlSessionFactory组件,并将sqlSessionFactory组件注入给Mapper组件。
4.5.测试
创建Service组件,然后测试
@Service("empService")
public class EmpServiceImpl implements EmpService{
@Autowired
private EmpMapper empMapper;
@Override
public Emp getEmpById(int empno) {
return empMapper.getEmpById(empno);
}
}
public class MsTest {
public static void main(String[] args) {
ApplicationContext context = new ClassPathXmlApplicationContext("spring.xml");
EmpService service = (EmpService)context.getBean("empService");
Emp emp = service.getEmpById(7369);
System.out.println(emp);
}
}4.6.添加事务管理
Spring为了支持事务管理,专门封装了事务管理对象。我们只要在Spring容器中配置这个对象,即可使用。
在Spring容器中添加事务管理的配置:
<!-- 配置Spring提供的事务管理器 -->
<bean id="transactionManager"
class="org.springframework.jdbc.datasource.DataSourceTransactionManager">
<property name="dataSource" ref="dataSource"></property>
</bean>
<!-- 开启注解事务 -->
<tx:annotation-driven transaction-manager="transactionManager" />
在Service组件中,使用@Transactional注解,就可以给业务方法添加事务管理。
@Transactional
public int transferAccounts(Emp emp1,Emp emp2) {
//需要事务管理的业务
}
注意:
需要事务管理的service,在方法上加上@Transactional 注解即可。
必须为public方法才行,不要捕捉异常,要让异常自动抛出,否则不能进行事务回滚。
4.7.事务传播行为
@Transactional 注解中的 propagation 属性,可以设置事务传播行为。属性值为:
-
REQUIRED:如果当前没有事务,就新建一个事务,如果已经存在一个事务中,就加入到这个事务中。这是最常见的选择。
-
SUPPORTS:支持当前事务,如果当前没有事务,就以非事务方式执行。
-
MANDATORY:使用当前的事务,如果当前没有事务,就抛出异常。
-
REQUIRES_NEW:新建事务,如果当前存在事务,把当前事务挂起。
-
NOT_SUPPORTED:以非事务方式执行操作,如果存在事务,就把当前事务挂起。
-
NEVER:以非事务方式执行,如果当前存在事务,则抛出异常。
@Override
@Transactional(propagation=Propagation.SUPPORTS)
public Dept getDeptById(Integer deptno) {
return deptMapper.getDeptById(deptno);
}